


*The content of this article is applicable to UE4.
Do you want to use C++ in Unreal Engine (create a C++ class)?
Do you want to run a C++ sample you found on the internet?
To meet these requests, you need to configure Unreal Engine to use C++.
This article explains How to install C++ in Unreal Engine and How to add C++ header files and source files (C++ classes).
目次
How to Introduce C++
Here are the steps to introduce C++ to Unreal Engine.
We will explain each step.
- Check the installation status of Visual Studio 2019
- Install Visual Studio 2019
- Generate Visual Studio project files
- Add C++ header files and source files (C++ classes)
- Build (compile) source code
1. Check the Installation Status of Visual Studio 2019
In order to use C++ with the Unreal Engine ("UE"), a C++ development environment must be installed.
Since Visual Studio 2019 is often used as the development environment, this article will explain how to install Visual Studio 2019.
You can check whether Visual Studio 2019 is installed by using one of the following methods (1), (2).
Method (1) Check by Creating a New Project
Launch the UE editor (UnrealEditor.exe).
On the project selection screen, select "Games" tab – "Blank", and select "C++" in Project Defaults (See the figure below).
If the message "No Compiler was found…" is displayed, it means that it is not yet installed.
Click the "Install Visual Studio 2019" button and proceed to STEP2.
If the message is not displayed, Visual Studio 2019 has already been installed, and you can proceed to STEP3.

Method (2) Check by Opening an Existing Project
Start a project that has already been created.
Select "Tools" tab – "New C++ Class…". (See the figure below).
If the message "No Compiler was found…" is displayed, it means that it is not yet installed.
Click the "Install Visual Studio 2019" button and proceed to STEP2.
If the message is not displayed, Visual Studio 2019 has already been installed, and you can proceed to STEP3.

2. Install Visual Studio 2019
You need to do this procedure if Visual Studio 2019 has not yet been installed.
On the screen that appears immediately after pressing the "Install Visual Studio 2019" button in STEP 1, we will download Visual Studio Installer.

Confirm the contents, and then go next step.
There are several editions for Visual Studio 2019.
We will install Visual Studio Community 2019, which is basically free for personal use.
For commercial use, please check Microsoft’s license terms.


Finally, the installation is complete when Visual Studio 2019 launches correctly.
Then, you need to reboot the PC.

3. Generate Visual Studio Project Files
Generate a Visual Studio project file.
The procedure depends on whether you want to create a new Unreal Engine project at the same time or generate a project file for an existing Unreal Engine project.
Case 1: A new Unreal Engine Project
Launch UnrealEditor.exe.
On the project selection screen, select "Games" tab – "Blank", select "C++" in Project Defaults, and press the "Create" button (See figure).
If you want to create a project without "C++" selection, generate a Visual Studio project file by the method described in Case 2.

The following error message may appear when you create a project. In this case, please install .NET Core runtime from the link in the error text.

After the creation process is completed, Visual Studio project file (.sln file) will be generated in the UE project folder.

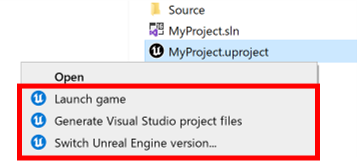
Case 2: An existing Unreal Engine Project
Launch an existing Unreal Engine project.
Visual Studio project file will be generated at the STEP4.
You can proceed to STEP4.
The following error message may appear during STEP4. In this case, you need to install .NET Core runtime from the link in the error message.
4. Add C++ header files and source files (C++ classes)
Select "Tools" tab – "New C++ Class…" and select the class you wish to add to the displayed screen.
Then, click the "Next" button (See the figure below).
In this example, Actor is selected.

Next, enter a file name (class name) and save location (See ① and ② in the figure), and click the "Create Class" button (See ③ in the figure).

Note that C++ files cannot be deleted, moved, or renamed in this procedure.
If you are familiar with C++ development, please refer to the following article for more details.
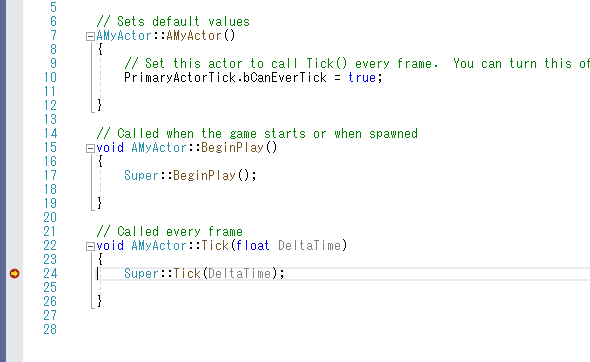
5. Build (Compile) Source Code
Close UE editor.
If not closed, an error will be raised at compile time.
Open the Visual Studio project file (.sln file) in the UE project folder and build it (See ① and ② in the figure).

If it ends normally, the compilation havesuccessfully completed.
From now, you can freely create C++ classes in this environment.

When to Perform the Same Procedure Again
For each of the steps (STEP 1-5), we need to be re-executed in the development in C++.
| STEP | Re-execution |
|---|---|
| 1-2 | Only once after you buy the PC |
| 3 | Only once after you create an Unreal Engine project |
| 4 | Execute each time when C++ file is changed (added, deleted, moved, renamed) |
| 5 | Each time when the source code (C++ file) is edited |