


You can build the Unreal Engine from source code released under some restrictions.
Using an unreleased Unreal Engine will face you the unforeseen issues.
However, there are advantages to using an unreleased Unreal Engine.
For example, you can use unreleased features, and apply patches for critical bug fixes.
This article explains how to build the Unreal Engine from source code and how to use the built Unreal Engine.
This article also explains how to debug the Unreal Engine.
Prerequisites
The procedure for building the Unreal Engine depends on the environment.
- OS
- Windows 10
- Software
How to build the Unreal Engine
To build the Unreal Engine, follow these steps.
- Download the Unreal Engine source code
- Download the dependency files
- Create a Visual Studio project file to build the Unreal Engine
- Configure the build configuration
- Build
- Run
1. Download the Unrael Engine source code
Download the Unreal Engine source code from GitHub.
To download the source code, you must have permission to access the Unreal Engine source code.
Please refer to Documentation to obtain access permissions in advance.
git clone https://github.com/EpicGames/UnrealEngine.git
cd UnrealEngine
Switch to the source code you wish to build.
Tags are created for each version of the Unreal Engine released.
Specify the tag corresponding to the version you wish to build.
To build version 5.0.0 of the Unreal Engine, execute the following command.
git checkout 5.0.0-release
To switch to the latest source code, execute the following command.
git checkout ue5-main
Cautions
When you place Unreal Engine source code in a DEEP directory, it may exceed the Windows absolute path length limit (256 characters) at build time and fail the build.
Try to download the source code in a directory with a shorter absolute path length.
.suppressed.exp files, which are intermediate files created at build time, tend to have longer path lengths.
If the path length limit is exceeded, the file can not be opened and an error will occur.
For example, UnrealEditor-VisualStudioCodeSourceCodeAccess.lib.response has 200 characters path length at least from the top repository.
/Engine/Plugins/Developer/VisualStudioCodeSourceCodeAccess/Intermediate/Build/Win64/UnrealEditor/
Development/VisualStudioCodeSourceCodeAccess/UnrealEditor-VisualStudioCodeSourceCodeAccess.lib.response
2. Download the dependent files
The obtained source code will be placed in the directory UnrealEngine.
In the directory UnrealEngine, you will find a bat file Setup.bat that downloads the dependency files to build Unreal Engine.
Double-click Setup.bat to download the dependency files.
3. Create a Visual Studio project file to build the Unreal Engine
Use Visual Studio to build Unreal Engine.
In the directory UnrealEngine, you will find a bat file GenerateProjectFiles.bat that creates the Visual Studio project files to build the Unreal Engine.
Double-click GenerateProjectFiles.bat to create the Visual Studio project files.
After this, the Visual Studio project file UE5.sln will be generated in the directory UnrealEngine.
4. Configure the build configuration
Double-click the generated Visual Studio project file UE5.sln to start Visual Studio.
Once Visual Studio is launched, configure the build configuration.
- Find the project [UE5] in the [Solution Explorer], right-click it and execute [Set as StartUp Project]
- Change [Solution Configuration] to [Development Editor] at the top of the screen
- Change [Solution Platform] to [Win64] at the top of the screen

5. Build
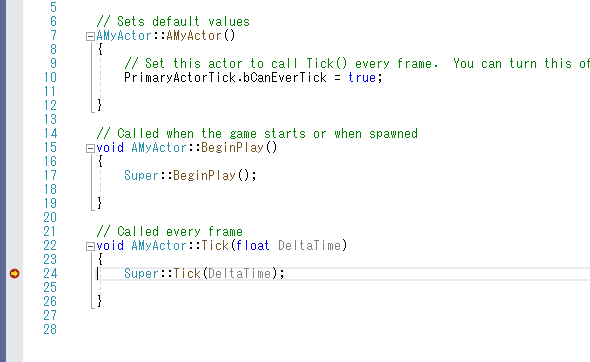
From the menu, run [Build] > [Build Solution] to build Unreal Engine 5.
6. Run
Once the build is complete, run the Unreal Engine.
There are two ways to run it.
- Execute [Debug] > [Start Without Debugging] from the menu
- Run from the executable file
UnraelEditor.exein the path/Engine/Binaries/Win64
How to debug Unreal Engine
This section describes how to debug builds of Unreal Engine and how to actually debug them.
1. Preparation
Build the Unreal Engine by referring to the Unreal Engine build instructions.
There is no need to change any build settings.
2. Debug execution
Run the Unreal Engine for debugging.
You can run the built Unreal Engine from the Visual Studio menu, but you cannot debug it because a different process will be launched.
So, run the Unreal Engine beforehand and attach the process after it was launched.
- Run the executable file
UnraelEditor.exein the path/Engine/Binaries/Win64 - Open your Unreal Engine project
- From the Visual Studio menu, run [Debug] > [Attach to Process…]
- Select the process
UnrealEditor.exethat was launched when you opened the Unreal Engine project

3. Set breakpoints
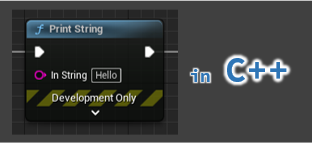
At this stage, the environment is ready for debugging and execution, so let’s set a breakpoint in the library function UKismetSystemLibrary::PrintString (Same as Print String node on the blueprint).
The source file of the library function UKismetSystemLibrary::PrintString is located in the path /Engine/Source/Runtime/Engine/Private/KismetSystemLibrary.cpp.
Open the source file in Visual Studio, find the library function definition UKismetSystemLibrary::PrintString and add a breakpoint on the first line.

Create a new Actor in the editor and connect a Print String node to the end of the Event Tick.

Compile the created Actor and place it on the level.
Click [Play this level in the active level editor viewport] to start gameplay, which will execute the PrintString node and stop the program at the breakpoint you set.
After this, you can do the step execution and examine the stack trace, just as you would in normal debugging.