


This article explains how to add a menu by right-clicking a Blueprint node.

This article assumes that you are familiar with the basic contents of creating the Blueprint node.
Please check the Basic article and the Execution Pin article if necessary.
- Create Your Own Blueprint Node by Inheriting K2Node (1) Basic
- Create Your Own Blueprint Node by Inheriting K2Node (2) Execution Pin
- Create Your Own Blueprint Node by Inheriting K2Node (3) Menu <— This article
- Create Your Own Blueprint Node by Inheriting K2Node (4) UI
目次
Source Code
The complete source code is available on GitHub.
https://github.com/colory-games/techblog-sample-projects/tree/main/nutti/20220702
To run the source code, follow these steps.
- Place the directory
MyManualSwitchintoPluginsin your Unreal Engine project directory. - Right click on the
.uprojectfile and create a project file for Visual Studio. - Open the project file and build the project.
- Run Unreal Engine from the
.uprojectfile and activate the "MyManualSwitch" plugin.
Specification of the Blueprint Node
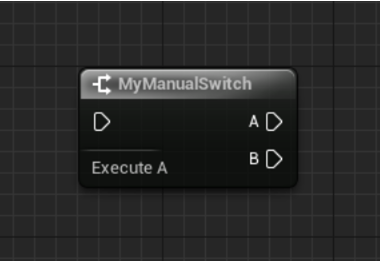
The specification of the Blueprint node "MyManualSwitch" is as follows.
- Add execution pins "A" and "B" on the output side.
- Add a menu when you right-click on a node.
- "Execute A": Execute execution pin "A".
- "Execute B": Execute execution pin "B".
Create a Module
Create a module by following to the description in the Basic section.
For the concreate instructions to create a module, please refer to the article for the basic.
Create a Blueprint Node
We can create a Blueprint node by the following steps.
- Inherit class
UK2Node. - Setup basic information.
- Add pins.
- Define the process of execution pins.
- Add menu.
Steps 1 and 2 are the almost same as in the article for the basic, so we will start from step 3.
3. Add Pins
Add the following pins to meet the specifications of the node.
| Pin Name | Input/Output | Role |
|---|---|---|
| Input | Execution the node. | |
| A | Output | Execute the node connected to this pin when the internal pin "Switch" is True. |
| B | Output | Execute the node connected to this pin when the internal pin "Switch" is False. |
| Switch | (Internal) | Execute the node connected to the execution pin "A" if True. |
We will implement the process of adding pins to AllocateDefaultPins.
CreatePin(EGPD_Input, UEdGraphSchema_K2::PC_Exec, UEdGraphSchema_K2::PN_Execute);
CreatePin(EGPD_Output, UEdGraphSchema_K2::PC_Exec, APinName);
CreatePin(EGPD_Output, UEdGraphSchema_K2::PC_Exec, BPinName);
// Create an internal pin.
UEdGraphPin* SwitchPin = CreatePin(EGPD_Input, UEdGraphSchema_K2::PC_Boolean, SwitchPinName);
SwitchPin->DefaultValue = "true";
SwitchPin->bHidden = true;
SwitchPin->bDefaultValueIsReadOnly = true;
SwitchPin->bNotConnectable = true;
Note that we add an internal pin "Switch" that holds a flag to switch the execution pin to execute.
By specifying the value "true" to the member variable DefaultValue, we can set the default value true.
4. Define the Process of Execution Pins
Define the process for the execution pin.
The node "MyManualSwitch" executes the node connected to the pin "A" when the internal pin "Switch" is True. If False, execute the node connected to the pin "B".
To implement this, we define the Blueprint compilation process.
The following is the Blueprint compilation process defined in the member function Compile.
UK2Node_MyManualSwitch* MyManualSwitchNode = CastChecked(Node);
UEdGraphPin* APin = MyManualSwitchNode->FindPin(APinName);
UEdGraphPin* BPin = MyManualSwitchNode->FindPin(BPinName);
// Get the internal pin "Switch".
UEdGraphPin* SwitchPin = MyManualSwitchNode->FindPin(SwitchPinName);
UEdGraphPin* SwitchNet = FEdGraphUtilities::GetNetFromPin(SwitchPin);
FBPTerminal* Switch = Context.NetMap.FindRef(SwitchNet);
// Transfer the control flow to the execution pin "B" when the value of the internal pin "Switch" is false.
FBlueprintCompiledStatement& GotoStatement = Context.AppendStatementForNode(MyManualSwitchNode);
GotoStatement.Type = KCST_GotoIfNot;
GotoStatement.LHS = Switch;
Context.GotoFixupRequestMap.Add(&GotoStatement, BPin);
// Transfer the control flow to the execution pin "A" when the value of the internal pin "Switch" is true.
GenerateSimpleThenGoto(Context, *MyManualSwitchNode, APin);
By creating a statement of type KCST_GotoIfNot and passing the variable of the internal pin "Switch" to the LHS of the statement FBlueprintCompiledStatement, we can implement the process for the execution pin "B".
The process of transferring execution control to the execution pin "A" is defined by calling the function GenerateSimpleThenGoto.
5. Add Menu
We will explain how to add items to the menu that appears when you right-click on the node "MyManualSwitch".
Note that the menu depends on the status of the internal pin "Switch".
- "Execute A": Execute execution pin "A".
- "Execute B": Execute execution pin "B
To add an item to the menu, override the member function GetNodeContextMenuActions and define the process to add the item.
void UK2Node_MyManualSwitch::GetNodeContextMenuActions(class UToolMenu* Menu, class UGraphNodeContextMenuContext* Context) const
{
    Super::GetNodeContextMenuActions(Menu, Context);
    FToolMenuSection& Section = Menu->AddSection("K2NodeMyManualSwitch", NSLOCTEXT("K2Node", "MyManualSwitchHeader", "My Manual Switch"));
    // Get the value of the internal pin "Switch".
    UEdGraphPin* Pin = FindPin(SwitchPinName);
    bool bExecuteB = Pin->GetDefaultAsString() == "true";
    if (!bExecuteB)
    {
        // Add menu item "Execute A".
        Section.AddMenuEntry(
            "ExecuteA",
            LOCTEXT("ExecuteA", "Execute A"),
            LOCTEXT("ExecuteATooltip", "Switch to execute A pin"),
            FSlateIcon(),
            FUIAction(FExecuteAction::CreateUObject(const_cast(this), &UK2Node_MyManualSwitch::ToggleSwitch)));
    }
    else
    {
        // Add menu item "Execute B".
        Section.AddMenuEntry(
            "ExecuteB",
            LOCTEXT("ExecuteB", "Execute B"),
            LOCTEXT("ExecuteBTooltip", "Switch to execute B pin"),
            FSlateIcon(),
            FUIAction(FExecuteAction::CreateUObject(const_cast(this), &UK2Node_MyManualSwitch::ToggleSwitch)));
    }
}
First, add a menu section (structure FToolMenuSection) by calling the member function AddSection of UToolMenu.
Then, get the value of the internal pin "Switch" and add a menu item by calling the member function AddMenuEntry of the structure FToolMenuSection.
Note that the menu item is changed depending on the value of the internal pin Switch.
The 5th argument of the member function AddSection is the member function ToggleSwitch that defines the process of switching the value of the internal pin Switch from "true" to "false" or vice versa.
The member function ToggleSwitch is defined as follows.
void UK2Node_MyManualSwitch::ToggleSwitch()
{
    Modify();
    // Change the value of the internal pin "Switch".
    UEdGraphPin* Pin = FindPin(SwitchPinName);
    if (Pin->GetDefaultAsString() == "true")
    {
        Pin->DefaultValue = "false";
    }
    else
    {
        Pin->DefaultValue = "true";
    }
    // Notify the data changes to the Blueprint editor.
    FBlueprintEditorUtils::MarkBlueprintAsStructurallyModified(GetBlueprint());
}
This member function checks the current value of the internal pin Switch and set the opposite of the current value.
Finally, the function FBlueprintEditorUtils::MarkBlueprintAsStructurallyModified is called to notify the Blueprint asset changes to the Blueprint editor.
This function needs to be called, to update the Blueprint editor to the latest state.
Use the Created Node
Let’s use the node you created.
Open the Blueprint Editor, right-click to display the menu, and enter "mymaualswitch" in the search box.

Select and place the node "MyManualSwitch" in the category "Flow Control".

When the created Actor is placed in the level, we can see that the execution pin will be changed depending on the value of the internal pin "Switch".